
Multiple Webcams in Fluidd
Note: These instructions are now outdated. Mainsail/Fluidd are no longer shipping with mjpeg-streamer. Please see https://github.com/mainsail-crew/crowsnest
Overview
With Fluidd Pi, configuring multiple webcams can be done right in the Fluidd UI. For Mainsail and Octoprint, the steps are essentially the same. However, the UI may be different.
The following steps assume that:
- Fluidd is up and running and visible in a browser
- SSH to the Raspberry Pi is working
The initial setup is outside the scope of this document. For directions on setting up Fluidd Pi, go to: https://docs.fluidd.xyz/installation.
Let's do this!
Gatthering Details
- Plug in all webcams, a Raspi Cam with a USB webcam or two USB webcams.
- Reboot the Pi
- SSH into your Pi
- We need the Device IDs from the two webcams. In the SSH window, execute the following command:
ls -l /dev/v4l/by-id/usb* - The output should look similar to below:
lrwxrwxrwx 1 root root 12 Feb 10 16:44 /dev/v4l/by-id/usb-XHT-5693-20101_Webcam_01.00.00-video-index0 -> ../../video2 lrwxrwxrwx 1 root root 12 Feb 10 16:44 /dev/v4l/by-id/usb-XHT-5693-20101_Webcam_01.00.00-video-index1 -> ../../video1 - We're interested in the Device IDs. Starting with the
/devup to and including the-indexX. Yours may be slightly different./dev/v4l/by-id/usb-XHT-5693-20101_Webcam_01.00.00-video-index0
Configure Streaming for the First Webcam
-
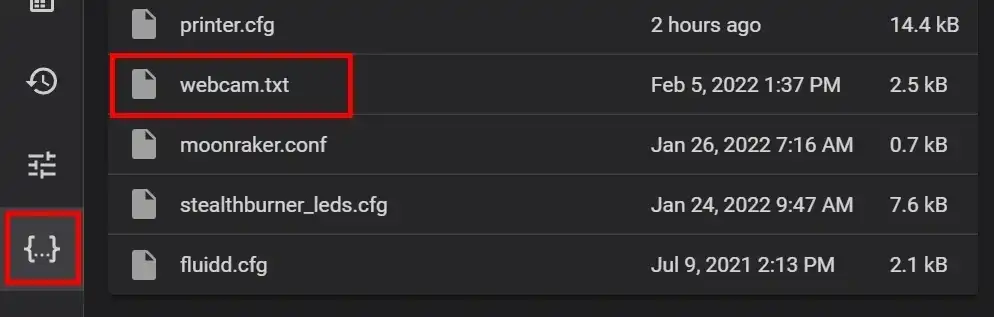
Open the Fluidd UI and in the left navigation, click Configuration. There should be one file called "webcam.txt"
-
Click the webcam.txt and click Edit. Notice that all of the lines are commented out (# at the beginning of each line).
#... ### Configure which camera to use # # Available options are: # - auto: tries first usb webcam, if that's not available tries raspi cam # - usb: only tries usb webcam # - raspi: only tries raspi cam # # Defaults to auto # #camera="auto" ### Additional options to supply to MJPG Streamer for the USB camera # # See https://faq.octoprint.org/mjpg-streamer-config for available options # # Defaults to a resolution of 640x480 px and a framerate of 10 fps # #camera_usb_options="-r 640x480 -f 10" #... -
We're going to edit lines 24 and 72 from the original. Change line 24 with your first Device ID from above. Be sure to remove the # from the begining of the line.
#camera_usb_options="-r 640x480 -f 10" camera_usb_options="-d /dev/v4l/by-id/usb-XHT-5693-20101_Webcam_01.00.00-video-index0 -r 640x480 -f 10" -
Change line 72, specifing port 8080. Don't forget to remove the leading # sign.
#camera_http_options="-n" camera_http_options="-n -p 8080" -
In the upper right corner, click Save, then click Close
-
In the upper right corner, click the ellipses menu, expand Services, click Restart webcamd
-
Open a browser, go to http://mipiserver:8080/?action=stream
-
You should see your first webcam! If not, check:
- webcam.txt has all the original text minus the two lines we've changed
- All lines in the webcam.txt should be comments (starting with #) except for the ones we've changed
- Rebooted the Pi
Adding the First Webcam to Fluidd
-
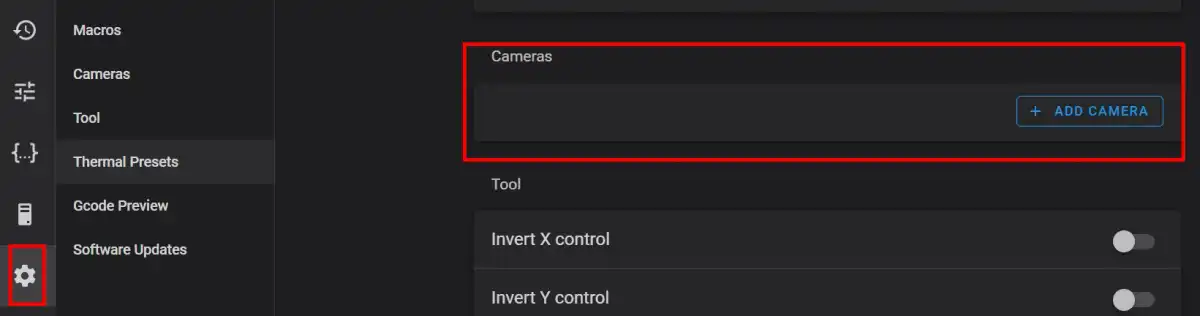
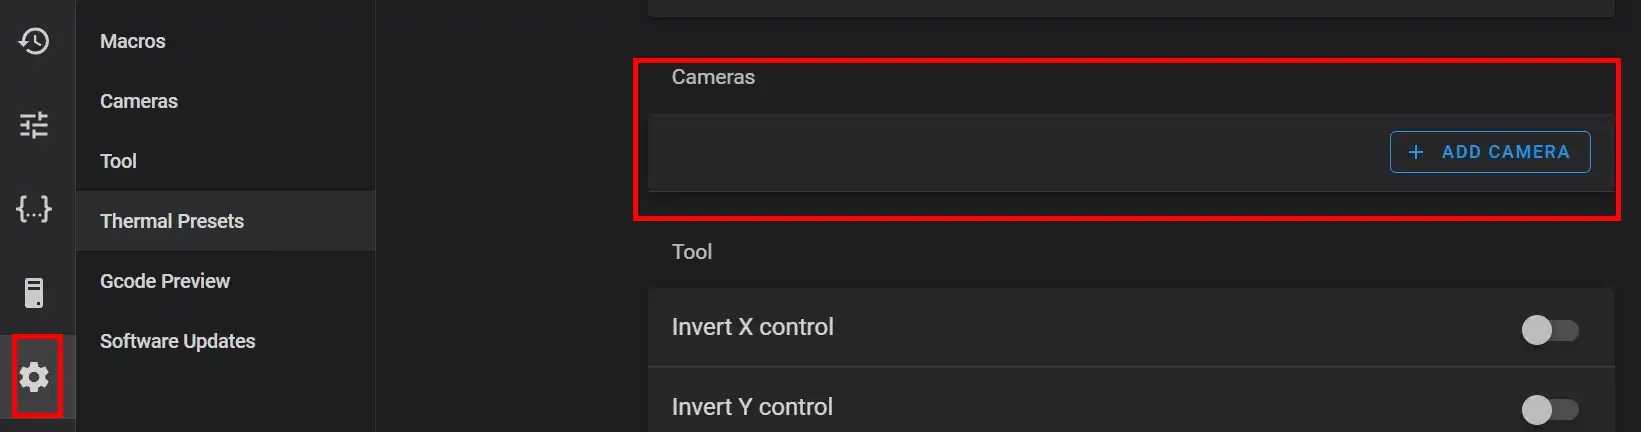
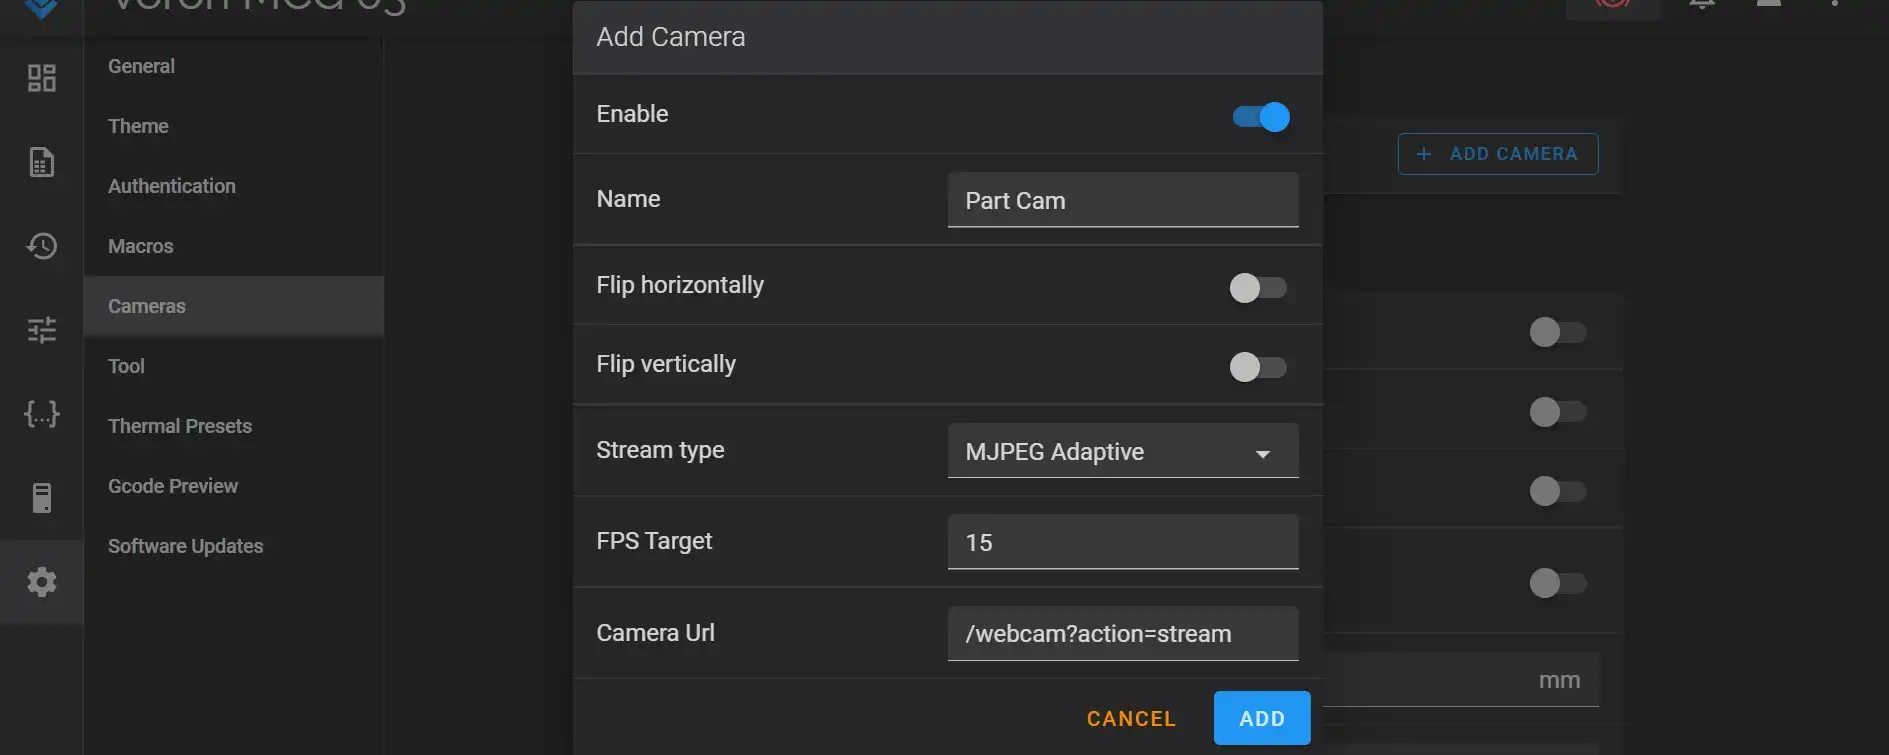
In Fluidd's left navigation, click Settings and scroll to the Cameras section
-
Click Add Camera
- Give it a name, such as Part Cam or Printer Cam
- For the Camera URL, use the full url
http://mipiserver:8080/?action=stream - Leave all other settings

-
Click Save
-
Navigate back to the Fluidd home page, ensure you now see your camera in the Cameras section. If not, try refreshing the screen or rebooting the Pi.

Success! Right now, the webcam is using only the default settings. The webcamd service is using the first camera it found and streaming on port 8080. More on modifying the settings after the second cam is working.
Streaming for the Second Webcam
-
Navigate back to Configuration, click the webcam.cfg, click Edit.
-
Copy all the text in the webcam.txt (Ctrl+a, Ctrl+c)
-
Close the webcam.txt
-
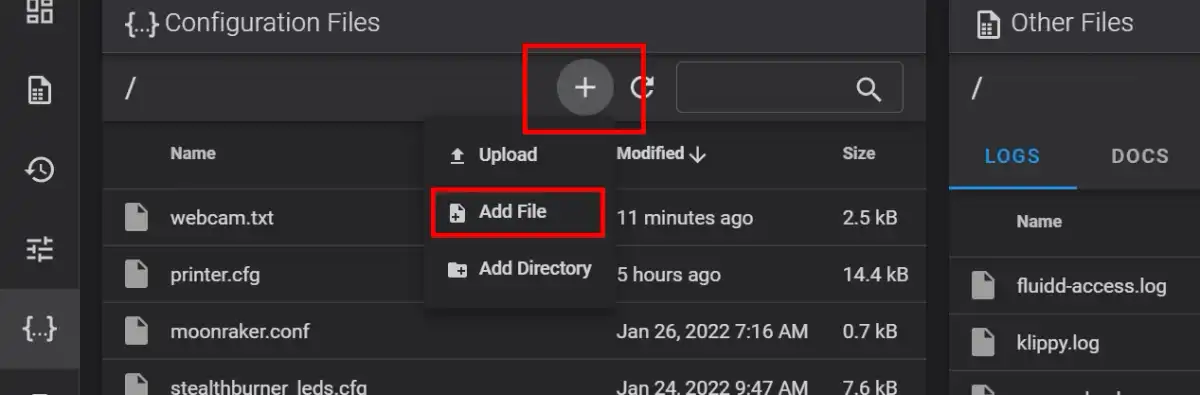
Create webcam2.txt - click the Plus, Add File
-
Use webcam2.txt for the filename
-
Click Save
-
Back in the Configuration Files list, click webcam2.txt, click Edit
-
Paste all of the text from webcam.txt into the webcam2.txt
-
Modify the file, changing the second Device Id and Port.
camera_usb_options="-d /dev/v4l/by-id/usb-XHT-5693-20101_Webcam_01.00.00-video-index0 -r 640x480 -f 10" camera_usb_options="-d /dev/v4l/by-id/usb-XHT-5693-20101_Webcam_01.00.00-video-index1 -r 640x480 -f 10" //... camera_http_options="-n -p 8080" camera_http_options="-n -p:8081" -
Fluidd -> Settings -> Webcams
-
Add second camera, name and full url:
http://mipiserver:8081/?action=stream -
Validate on home page
Appendix
Original webcam.txt
### Windows users: To edit this file use Notepad++, VSCode, Atom or SublimeText.
### Do not use Notepad or WordPad.

### MacOSX users: If you use Textedit to edit this file make sure to use
### "plain text format" and "disable smart quotes" in "Textedit > Preferences"

### Configure which camera to use
#
# Available options are:
# - auto: tries first usb webcam, if that's not available tries raspi cam
# - usb: only tries usb webcam
# - raspi: only tries raspi cam
#
# Defaults to auto
#
#camera="auto"

### Additional options to supply to MJPG Streamer for the USB camera
#
# See https://faq.octoprint.org/mjpg-streamer-config for available options
#
# Defaults to a resolution of 640x480 px and a framerate of 10 fps
#
#camera_usb_options="-r 640x480 -f 10"

### Additional webcam devices known to cause problems with -f
#
# Apparently there a some devices out there that with the current
# mjpg_streamer release do not support the -f parameter (for specifying
# the capturing framerate) and will just refuse to output an image if it
# is supplied.
#
# The webcam daemon will detect those devices by their USB Vendor and Product
# ID and remove the -f parameter from the options provided to mjpg_streamer.
#
# By default, this is done for the following devices:
#   Logitech C170 (046d:082b)
#   GEMBIRD (1908:2310)
#   Genius F100 (0458:708c)
#   Cubeternet GL-UPC822 UVC WebCam (1e4e:0102)
#
# Using the following option it is possible to add additional devices. If
# your webcam happens to show above symptoms, try determining your cam's
# vendor and product id via lsusb, activating the line below by removing # and
# adding it, e.g. for two broken cameras "aabb:ccdd" and "aabb:eeff"
#
#   additional_brokenfps_usb_devices=("aabb:ccdd" "aabb:eeff")
#
#
#additional_brokenfps_usb_devices=()

### Additional options to supply to MJPG Streamer for the RasPi Cam
#
# See https://faq.octoprint.org/mjpg-streamer-config for available options
#
# Defaults to 10fps
#
#camera_raspi_options="-fps 10"

### Configuration of camera HTTP output
#
# Usually you should NOT need to change this at all! Only touch if you
# know what you are doing and what the parameters mean.
#
# Below settings are used in the mjpg-streamer call like this:
#
#   -o "output_http.so -w $camera_http_webroot $camera_http_options"
#
# Current working directory is the mjpg-streamer base directory.
#
#camera_http_webroot="./www-fluidd"
#camera_http_options="-n"

### EXPERIMENTAL
# Support for different streamer types.
#
# Available options:
#   mjpeg [default] - stable MJPG-streamer
#camera_streamer=mjpeg